

How to Hang a Picture: The Complete Guide
Quick answer
Hang most pictures so the center of the frame sits 57 to 60 inches from the floor, which is gallery eye level. Use a level when you mark the wall. For frames under 10 pounds, a single picture-hanging nail or screw is enough. For 10 to 25 pounds, use a drywall anchor rated for the weight. For 25 pounds or more, hang from a wall stud or install a French cleat. Above furniture, position the bottom of the frame 6 to 12 inches above the furniture, and pick a frame about two-thirds the width of the piece below it.
How to Hang a Picture: A Complete Guide
The right height, the right hardware, and the right wall prep make hanging a picture a ten-minute job. This guide covers every part of that decision: eye level, anchors, gallery layout, heavy frames, and the small mistakes that cost the most time.
A picture hangs well when three small decisions go right: the height, the hardware, and the wall prep. Get those three right and the frame stays level for years. Get one wrong and the frame leans, slips, or eventually falls. This guide walks through each decision in the order you make it, then covers the special cases (gallery walls, heavy frames, tricky walls) and the most common mistakes.
Tools, Hardware, and Measurements for Hanging Pictures
Museums and galleries hang artwork so the visual center of the piece sits at 57 inches from the floor. The number reflects the average eye level of an adult standing in a gallery. Many residential designers extend the range to 57 to 60 inches because residential ceilings, sofas, and traffic patterns vary more than gallery walls do.
This is the single most useful number for hanging a picture. If you remember nothing else, remember that the center of the frame belongs at 57 to 60 inches from the floor, not the top edge and not the hanging hardware.
When to adjust away from the rule:
- Above furniture. Use the above-furniture rule instead (see below). The eye-level rule loses to the furniture rule in a conflict.
- Stairwells. Hang each frame at the eye level of someone standing on the step directly in front of it, not at a single 57-inch line for the whole flight.
- Grouped frames. Center the visual mass of the whole group at 57 to 60 inches. Individual frames inside the group will sit higher and lower than that line.
- Very tall walls. Resist hanging higher just because there is more wall. Eye-level still wins.
- Children's rooms. Drop to 48 to 52 inches so a child can actually look at the picture.
Step-by-step: hanging a single picture
Tools you need before you start:
- A tape measure
- A pencil
- A bubble level (a 9 inch torpedo level is enough for most frames)
- A stud finder (any model, magnetic or electronic)
- The right hanging hardware for your frame's weight (see the next section)
- A small drill or screwdriver
The process:
- Decide the visual center of the frame on the wall. For a single picture on a blank wall, that is 57 to 60 inches from the floor. For a picture above furniture, that is 6 to 12 inches above the top of the furniture, with the frame roughly two-thirds the width of the piece below.
- Mark the center point on the wall with a small pencil dot. A dot is precise; a line is approximate. You will erase it later.
- Measure the wire or hardware drop on the back of the frame. Lay the frame face-down. With the picture wire pulled up as it will sit on the hook, measure from the peak of the wire (or the top of the sawtooth slot, or the top of the two-point hanger slot) to the top edge of the frame. Write that number down.
- Calculate the hook position. From the pencil dot, measure up by half the frame's height, then subtract the hardware drop from step 3. That is where the wall hook goes. Mark it with a second pencil dot.
- Check for a stud at the hook position. Run the stud finder horizontally across the second pencil dot. If a stud is within an inch or two, shift the hook to land on it. A stud holds dramatically more weight than drywall.
- Install the hook or anchor. Match the hardware to the frame's total weight (frame plus glazing plus mat plus mounting plus art). When in doubt, round up.
- Hang the frame. Lift onto the hook. Tilt slightly until the wire or hanger catches and pulls taut.
- Level the frame. Place the bubble level along the top edge. Nudge the frame left or right until centered, and up or down a hair if the hardware allows it. Hold the bottom corner against the wall and step back.
The whole process takes ten minutes once you have done it twice.
Choosing the right hardware
The hardware on the back of the frame, the wire that holds it, and the hook that goes into the wall are three separate decisions. All three have to match the frame's total weight.
| Frame weight | Frame-back hardware | Wall hardware |
|---|---|---|
| Under 5 lbs | Sawtooth hanger | Picture-hanging nail or small hook |
| 5 to 10 lbs | D-rings with picture wire | Standard picture-hanging hook |
| 10 to 25 lbs | D-rings with picture wire (heavy-duty) | Drywall anchor or stud screw |
| 25 to 50 lbs | Two-point hangers or French cleat | Stud screws or heavy-duty anchors |
| Over 50 lbs | French cleat | Stud-mounted only |
Add up the frame, the glazing, the mat board, the mounting board, and the artwork. Use the total, not the frame alone. Acrylic glazing weighs less than glass and is the first choice when weight is a concern, on stairwells, or anywhere a fall would shatter glazing onto the floor.
For full step-by-step installation of D-rings, sawtooth hangers, two-point hangers, and French cleats, see our picture frame hanging hardware installation guide.
Hanging on brick, concrete, plaster, and drywall
The hook on the wall is only as strong as the wall behind it. Match the anchor to the surface.
Drywall (1/2 inch or 5/8 inch). A picture-hanging nail driven at the standard 45-degree downward angle holds 5 to 10 pounds in drywall alone. For 10 to 25 pounds, switch to a self-drilling threaded plastic anchor or a metal screw-in anchor rated for the weight. For 25 to 50 pounds, use a metal toggle bolt or hang directly from a stud with a 2.5-inch wood screw.
Plaster (older homes, often over wood lath). Plaster cracks if you hammer a nail straight in. Drill a 1/16-inch pilot hole first, then drive the nail or screw through the pilot. For frames over 10 pounds, use a plaster picture hook or a toggle anchor; pre-drill the toggle hole to size to avoid spider cracking.
Brick. Use a masonry drill bit and a sleeve or wedge anchor rated for the frame weight. Drilling into the mortar joint rather than the brick face is easier on the bit and easier to patch if you ever move the frame. For removable hangs on standard 2.25-inch brick, brick clips slip over the brick edge without any drilling and hold up to 25 pounds.
Concrete (basement walls, modern construction). A standard drill will not bite concrete; use a hammer drill with a masonry bit and a concrete screw (Tapcon style) or a sleeve anchor rated for the load. For frames under 5 pounds, hardened steel concrete nails set with a hand-drive tool are a faster option.
Hanging without nails
For renters, smooth-finish walls, or arrangements that move often, adhesive hardware is the cleanest option.
Command Strips and equivalents. A single picture-hanging strip pair holds 4 to 8 pounds. A four-pair set holds about 16 pounds. Stay under the rated weight, not at it, because shear strength drops as glazing weight pulls the strip away from the wall over time. Press each strip firmly for 30 seconds, then wait one hour before hanging the frame so the adhesive cures.
Adhesive hooks. Single hooks hold 1 to 5 pounds depending on the model. Use two hooks set level for any frame wider than 12 inches so the load spreads across both anchor points.
Where adhesive fails. Textured walls, glossy enamel, freshly painted surfaces (less than three weeks cured), wallpaper, and raw plaster all release adhesive early. For frames over 16 pounds, a stud screw or a French cleat is the safer choice regardless of how clean the wall looks.
Hanging above furniture
A picture hung above a sofa, bed, dresser, or console table follows a different rule than a picture on a blank wall. The eye-level rule loses to the furniture rule because the visual relationship between the frame and the furniture matters more than the absolute height.
The 6 to 12 inch rule. The bottom of the frame should sit 6 to 12 inches above the top of the furniture. Closer than 6 inches and the frame looks crowded against the back of the sofa. Farther than 12 inches and the frame floats untethered above the piece below it.
The two-thirds width rule. A single frame above a piece of furniture should be roughly two-thirds the width of the furniture. A 72-inch sofa pairs with a frame about 48 inches wide. Smaller than two-thirds and the frame looks lost. Wider than the furniture and the frame looks oversized.
A practical sequence: measure the furniture width, calculate two-thirds, find a frame size that hits that target, then position the bottom of the frame 6 to 12 inches above the furniture top. The center of the frame will fall somewhere in the 60 to 66 inch range above the floor for a typical sofa, which is slightly above pure eye level. That is fine; the furniture context resolves the higher placement visually.
For wider arrangements, a triptych of three frames (each one-third the width of the furniture, with 3-inch gaps between) reads as a single composition and follows the same 6 to 12 inch rule above the furniture.
Gallery wall basics
A gallery wall is any arrangement of three or more frames hung together as a single visual group. The hard part is not the individual frames, it is the spacing and the alignment of the group.
Spacing. 2 to 3 inches between frames. Less than 2 inches and the frames look cramped together. More than 3 inches and the group reads as separate pictures rather than one composition.
Anchor piece. Start with the largest or most visually dominant frame as the anchor. Place it slightly off-center within the group, then arrange the smaller frames around it. The anchor's center sits at 57 to 60 inches from the floor; the other frames fall above and below.
Mixed sizes. Vary frame sizes within the group. A wall of identical frames at identical spacing reads as wallpaper, not a composition. A mix of three sizes (one large, two medium, three small for a typical wall) gives the eye a path through the group.
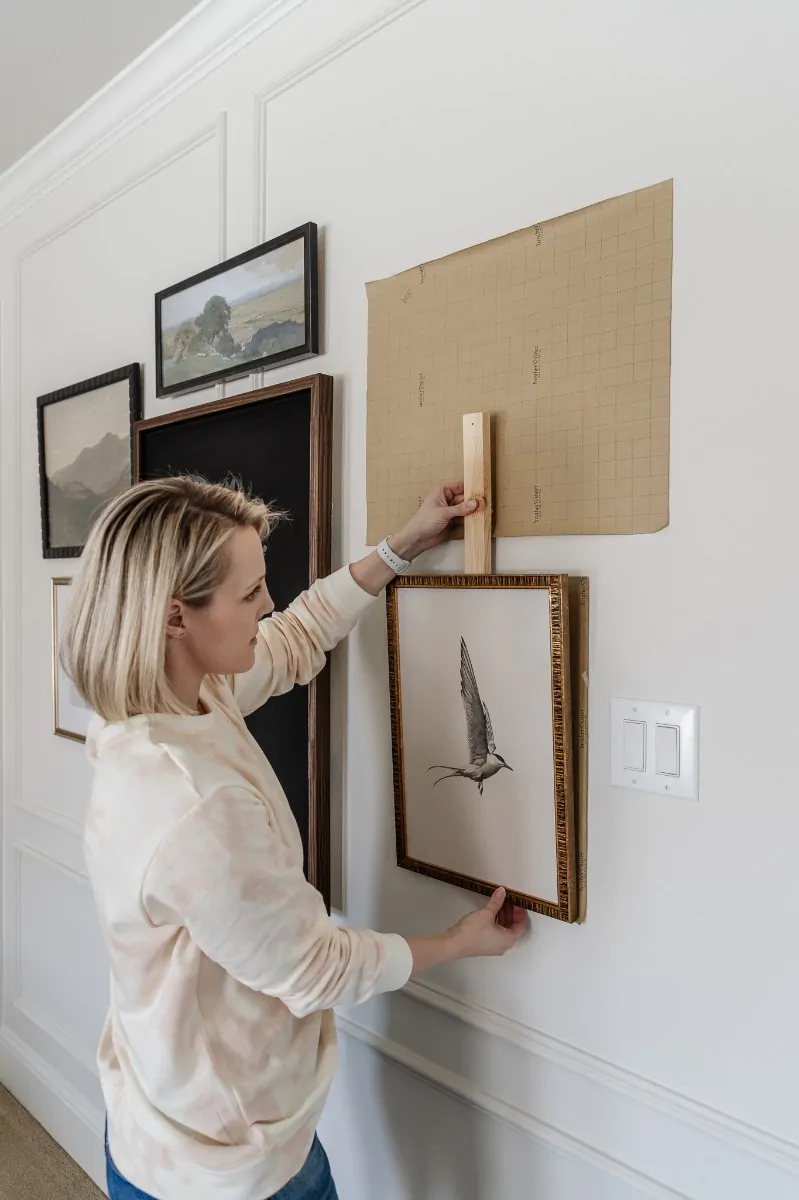
Plan on the floor first. Lay the frames on the floor in the arrangement you want before lifting anything onto the wall. Adjust until it looks right. Trace each frame on craft paper, cut out the templates, and tape them to the wall to preview the layout at scale before any holes get drilled.
For full layout templates and group composition strategies, see our gallery wall layouts guide and the longer gallery wall design guide.
For jersey shadow boxes specifically, see our how to frame a jersey guide for the mat board insert and stitching method before you hang it.
Hanging heavy frames safely
Weight is the single biggest reason frames fall off walls. Drywall by itself is rated for very little weight. A standard picture-hanging nail in drywall holds 5 to 10 pounds with a comfortable margin. Beyond that, the wall hardware has to do real work.
Under 10 pounds. A single picture-hanging nail or small hook is enough. The angled nail design lets the head sit slightly downward, which holds the wire securely.
10 to 25 pounds. Use a drywall anchor rated for the weight, or hang from a stud. Plastic anchors handle this range. Self-drilling threaded anchors are easier to install than the older two-piece toggle types and hold comparable weight.
25 to 50 pounds. A stud-mounted screw is the right answer. Use a stud finder to locate the wall stud, drill a small pilot hole, and drive a 2.5-inch wood screw directly into the stud. If a stud is not in the right spot, use heavy-duty toggle bolts rated for 50+ pounds. Two anchors are better than one when the frame is wide.
Over 50 pounds. Install a French cleat across two studs if possible. The cleat distributes the load horizontally and engages multiple structural attachment points. Shadow boxes, large canvases, and oversized memorabilia displays belong on cleats.
Acrylic glazing on heavy frames. Framer's grade acrylic weighs less than glass, so the total weight on a large frame stays lower than a glass-glazed equivalent. That alone may move a frame down a hardware tier (from cleat to anchor, or from anchor to nail), which simplifies the installation and reduces the wall damage if you ever move.
Common mistakes and quick fixes
- Hung too high. Fix: take it down and rehang at 57 to 60 inches to center, or 6 to 12 inches above the furniture.
- Frame keeps tilting forward. The D-rings are too high on the frame back, putting the wire too close to the top edge. Fix: reinstall the D-rings 1/4 to 1/3 of the frame's height down from the top.
- Wire showing above the frame. Same cause as tilting forward. Reinstall the D-rings lower.
- Anchor pulling out of the wall. The anchor was undersized for the weight, or it was installed in a soft spot of the drywall. Fix: pull the failed anchor, patch the hole with spackle, locate a stud, and reinstall on the stud or in a fresh spot with a heavier anchor.
- Frame slips sideways over time. The wire is too tight, or there is only a single hanging point. Fix: add a small amount of slack to the wire so it sits at 2 to 3 inches below the top of the frame, or switch to two-point hangers and two wall screws.
- Frame off-center on the wall. The center reference was approximate, not measured. Fix: pull the frame, measure the wall span, mark the true center with a pencil dot, and rehang.
- Crooked after a week. A single wire over a single hook will rotate a small amount with vibration. Fix: place two small adhesive bumpers on the bottom back corners of the frame to grip the wall, or switch to two-point hangers.
Hanging hacks worth knowing
A few hangs benefit from a small trick that the standard process does not cover. Three of them solve the most common pain points: catching a wire on a nail you cannot quite see, marking a sawtooth hanger spot in one shot, and lining up two-point hangers without measuring twice.
Fork hanging hack for picture frame wire
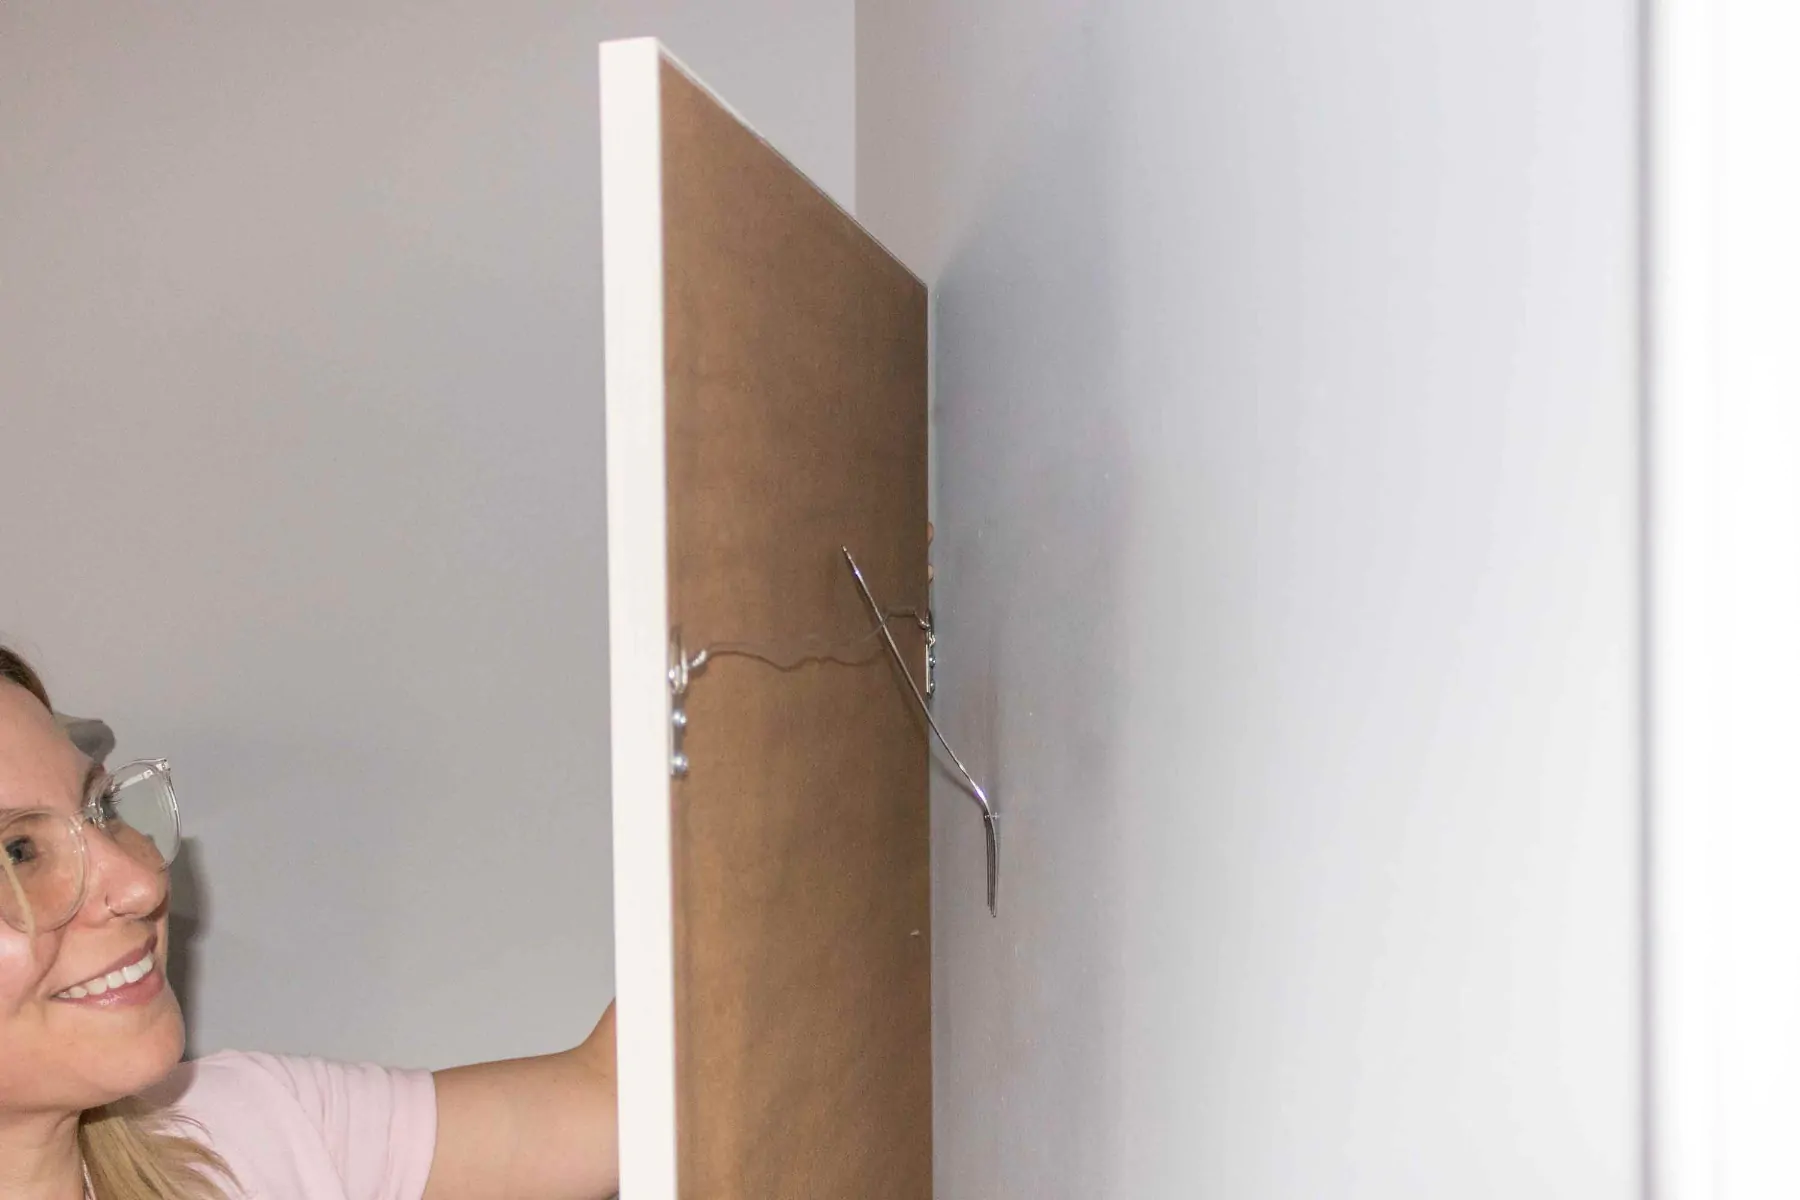
Trying to snag the wire on a nail behind a frame can mean a lot of blind guesswork and a few extra scuffs on the wall. A regular dinner fork takes the guesswork out.
Grab a fork from the kitchen and hold it against the wall with the bottom curve of the tines facing in toward the wall, handle pointing down. Place the fork so the curve of the tines sits just above the nail head.
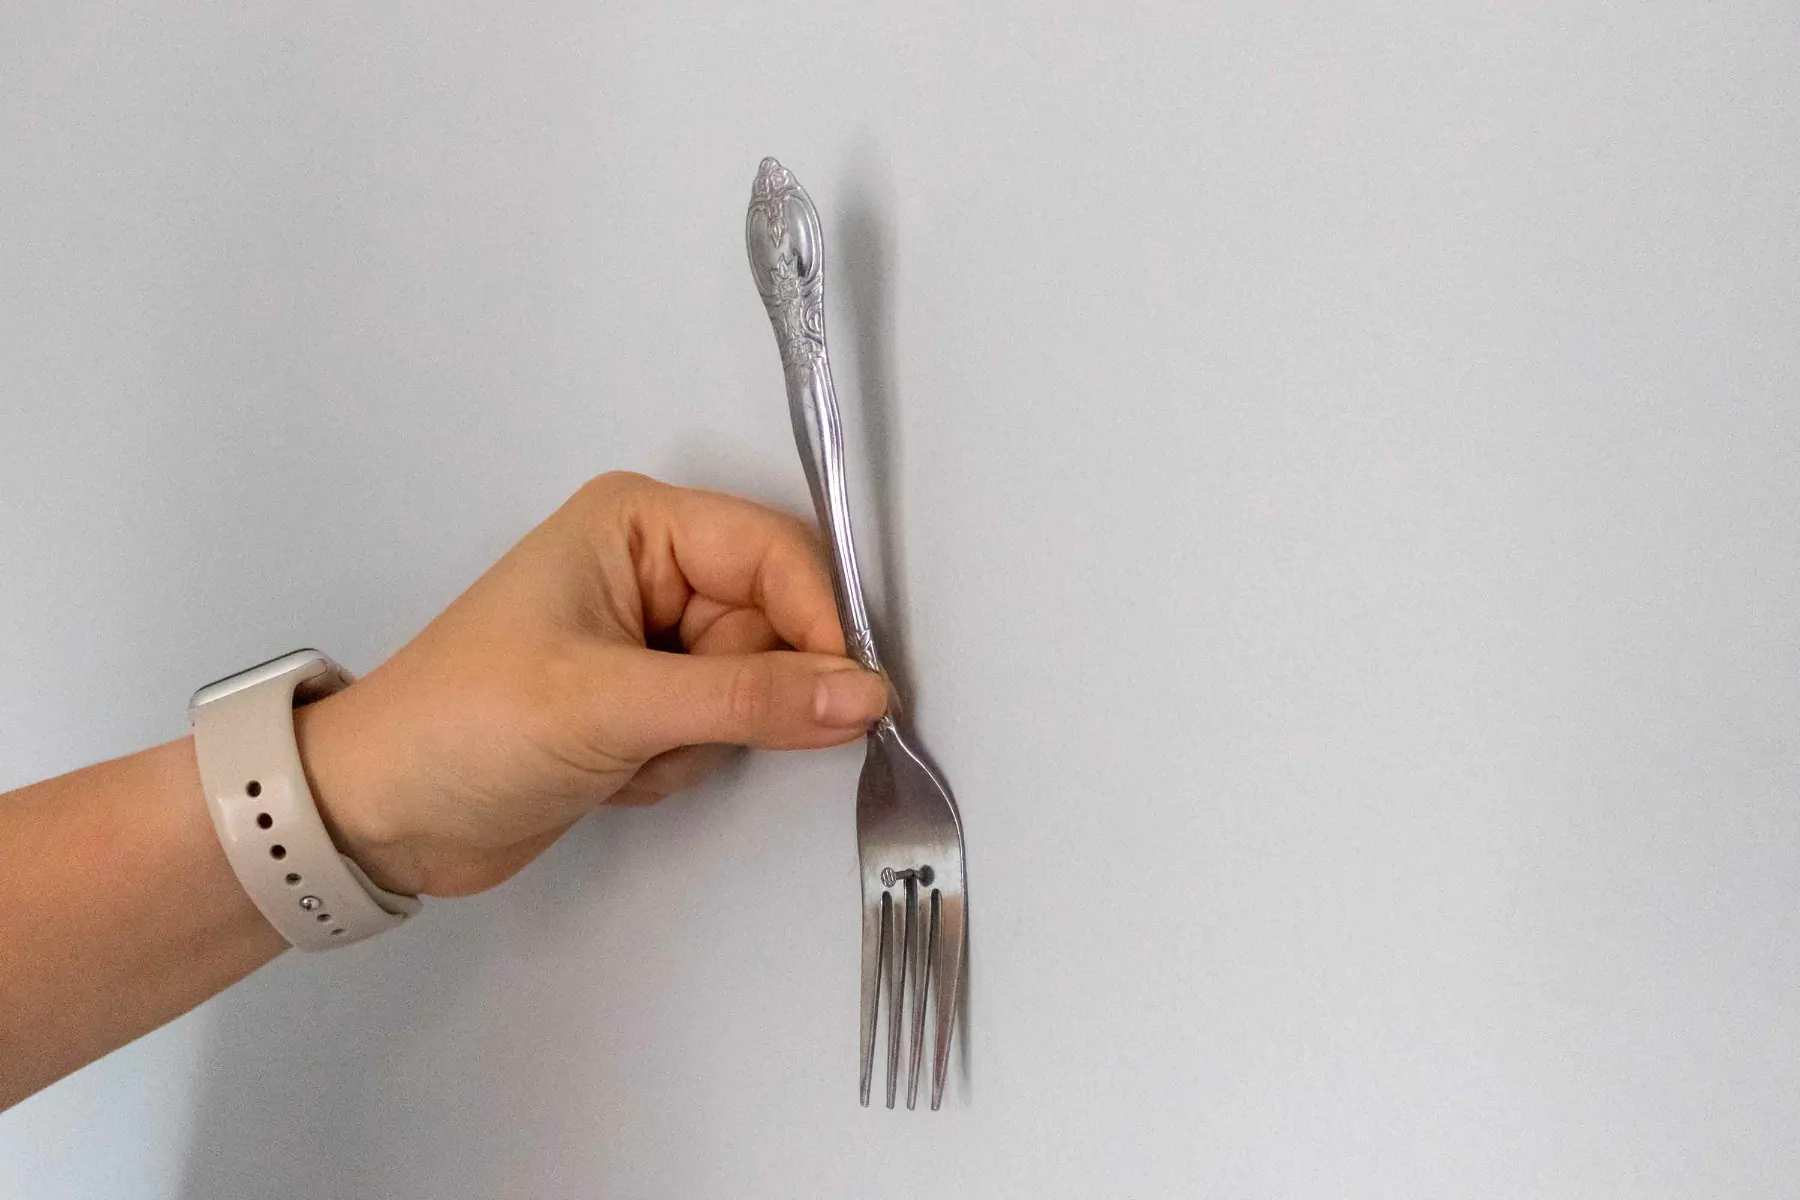
Lift the frame and slide it down over the fork's handle. The handle acts as a ramp that guides the wire straight onto the nail. Once the wire engages the nail, pull the fork out and the frame is hung.
Easy DIY tool for sawtooth hangers
A sawtooth hanger is hard to mark accurately because the hanger sits a fraction of an inch below the top edge of the frame, and you cannot see it once the frame is against the wall. A scrap of wood and a screw turn that into a one-step measurement.
Take a piece of scrap wood (a paint stir stick or a length of pine works) and drive a screw partway through one end so the tip just protrudes past the wood.
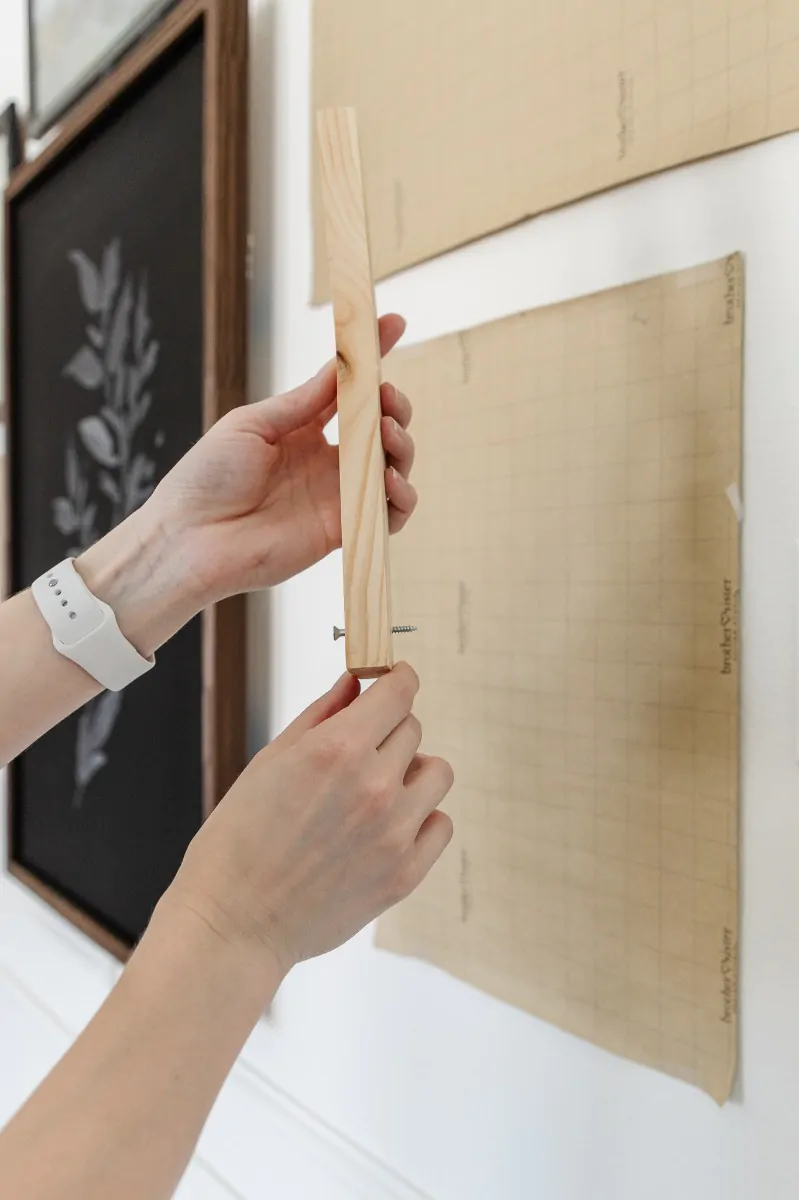
Lay the wood across the back of the frame so the screw tip lines up against the sawtooth hanger. Note how far down the wood the screw sits relative to the top edge of the frame. That distance is the offset between the top of the frame and the nail position on the wall.
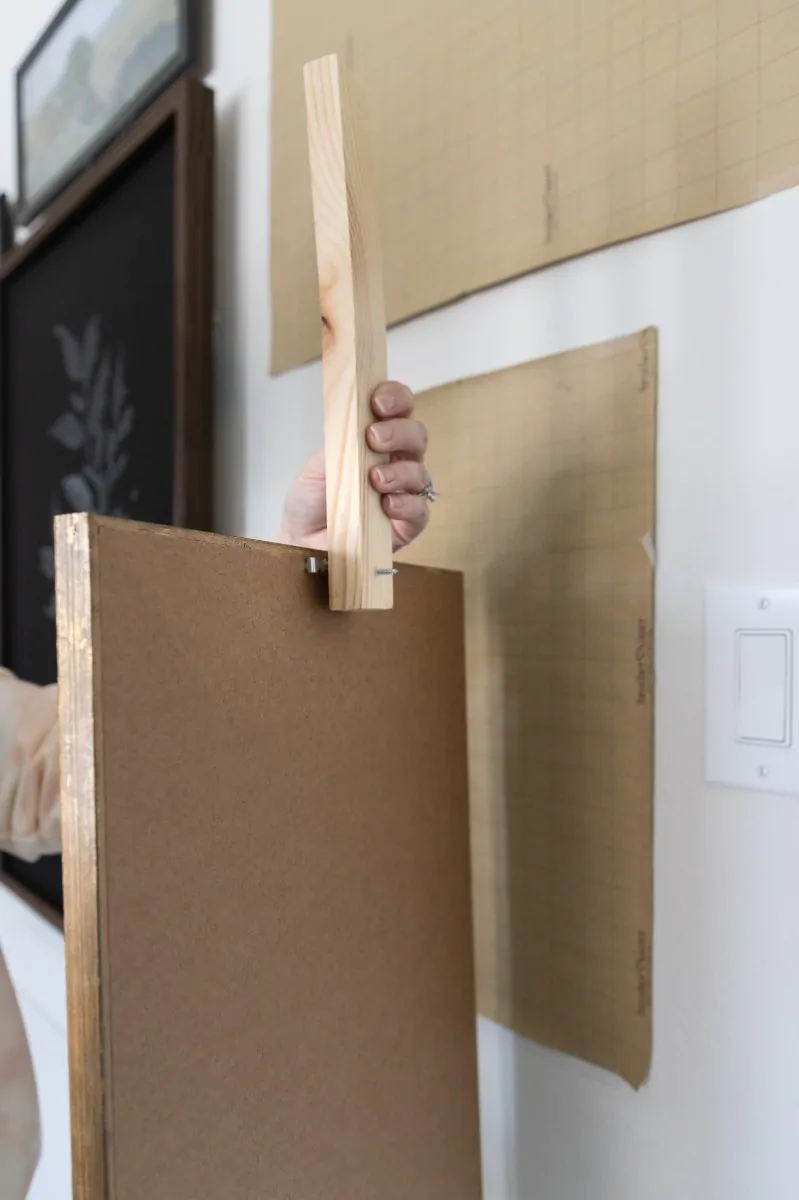
Hold the frame against the wall at the right height, then slide the wood up so the top of the wood matches the top of the frame and the screw tip presses against the wall. Push the screw tip into the wall to leave a small indent. That indent is exactly where the nail goes. If you have already taped paper templates to the wall (a good idea for gallery walls), press the screw tip into the template and use that pinprick.
Painters tape hanging hack for two-point hangers
For frames with two D-rings or two-point hangers, getting both wall nails at exactly the right spacing is the hard part. A strip of painters tape captures both positions in one move.
Lay a strip of painters tape across the back of the frame, pressed down over both hanging points and across the wire (if the frame uses one). Use a pen to mark the exact position of each hanger on the tape.
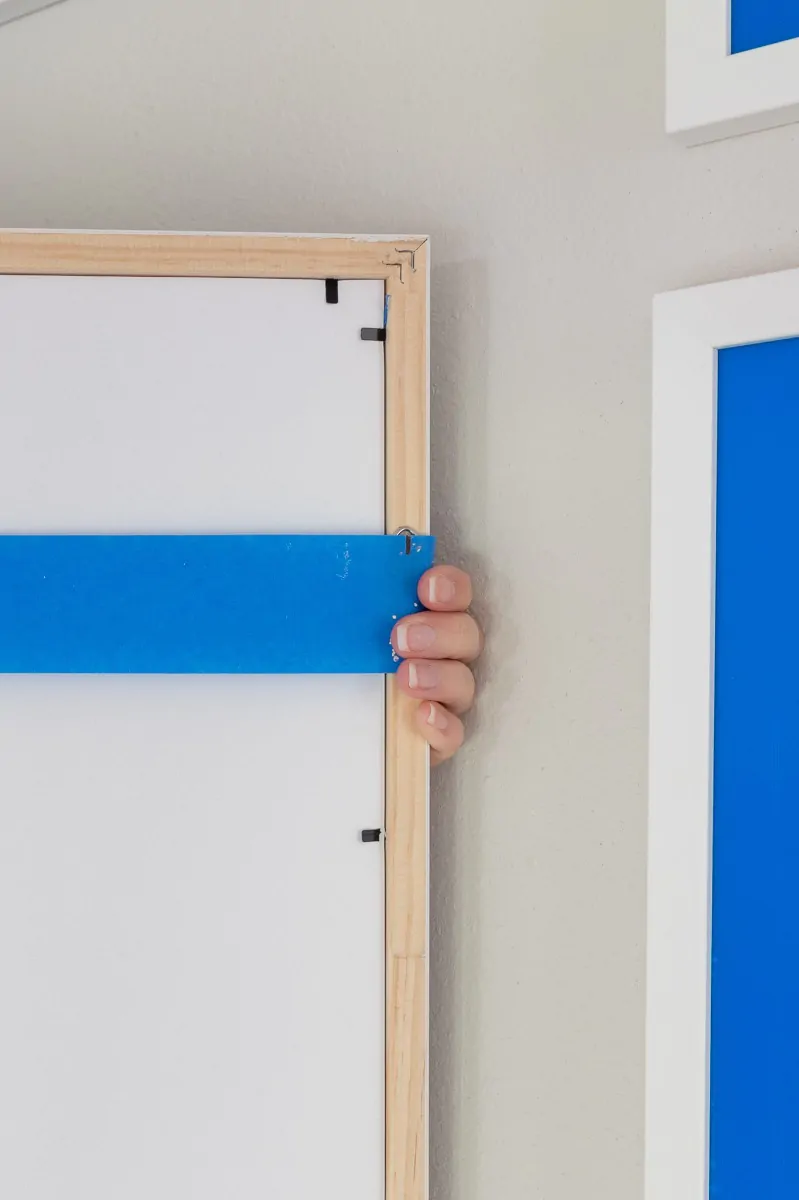
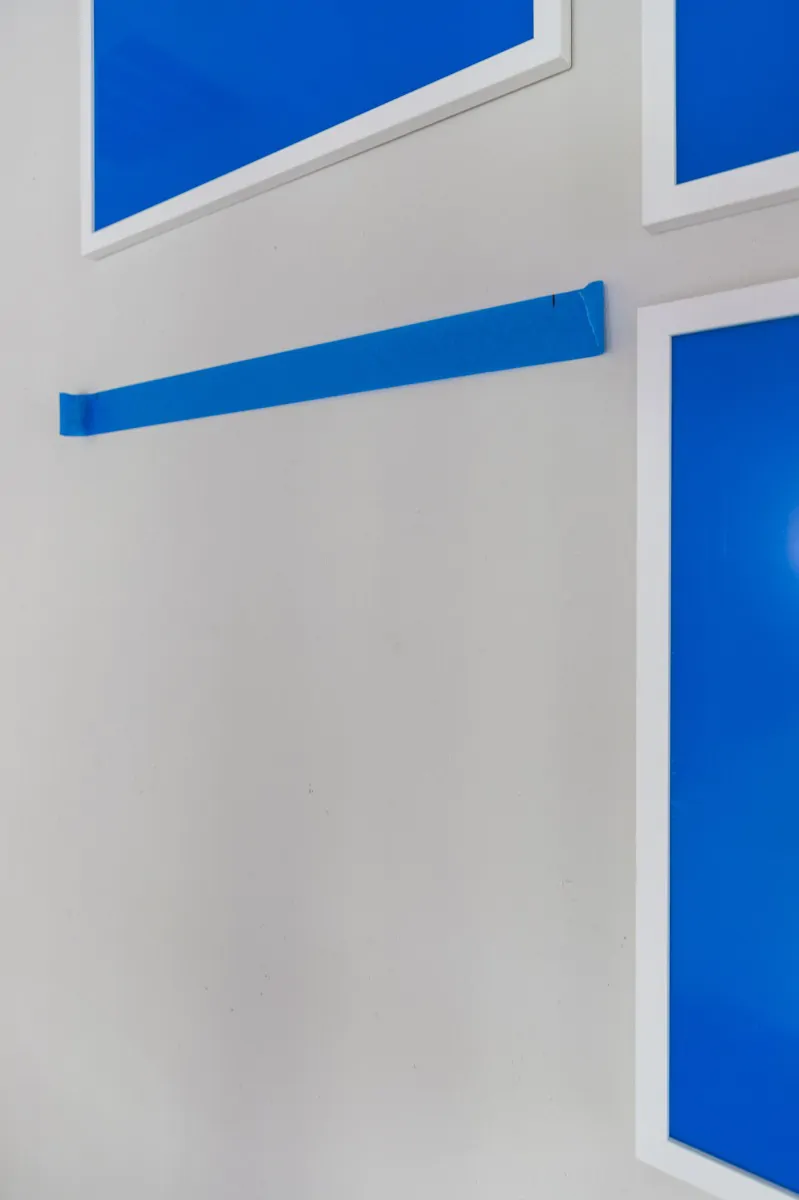
Peel the tape off the frame, keeping it taut so the marks stay in place, and stick it to the wall at the planned hanging height. Level it before pressing the second end down so the two marks sit on a true horizontal.
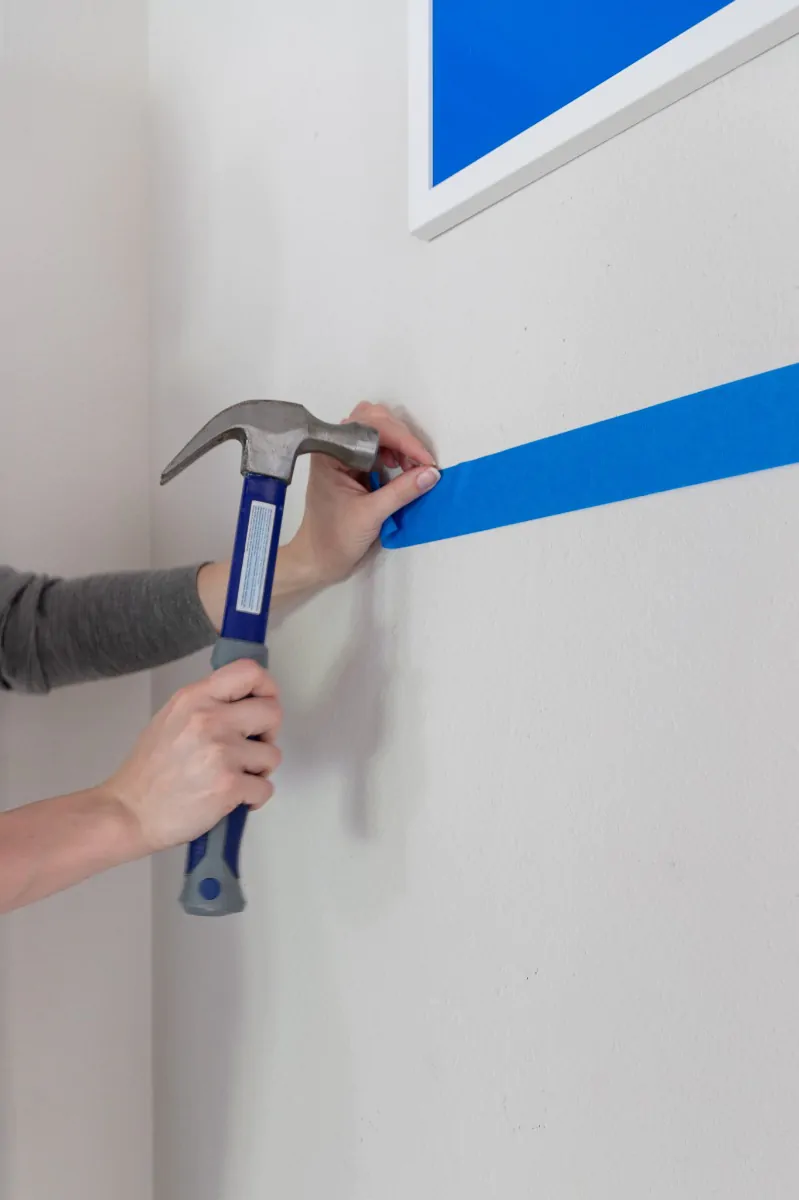
Hammer a nail in at each mark, then pull the tape off the wall. The nails are now in the exact positions to catch the hangers on the frame.
For a tight gallery grid, the same trick works for spacing between frames: stick a small tape tab at each outer corner of the next frame's planned position on the wall before drilling, then peel the tabs once the frame is up.
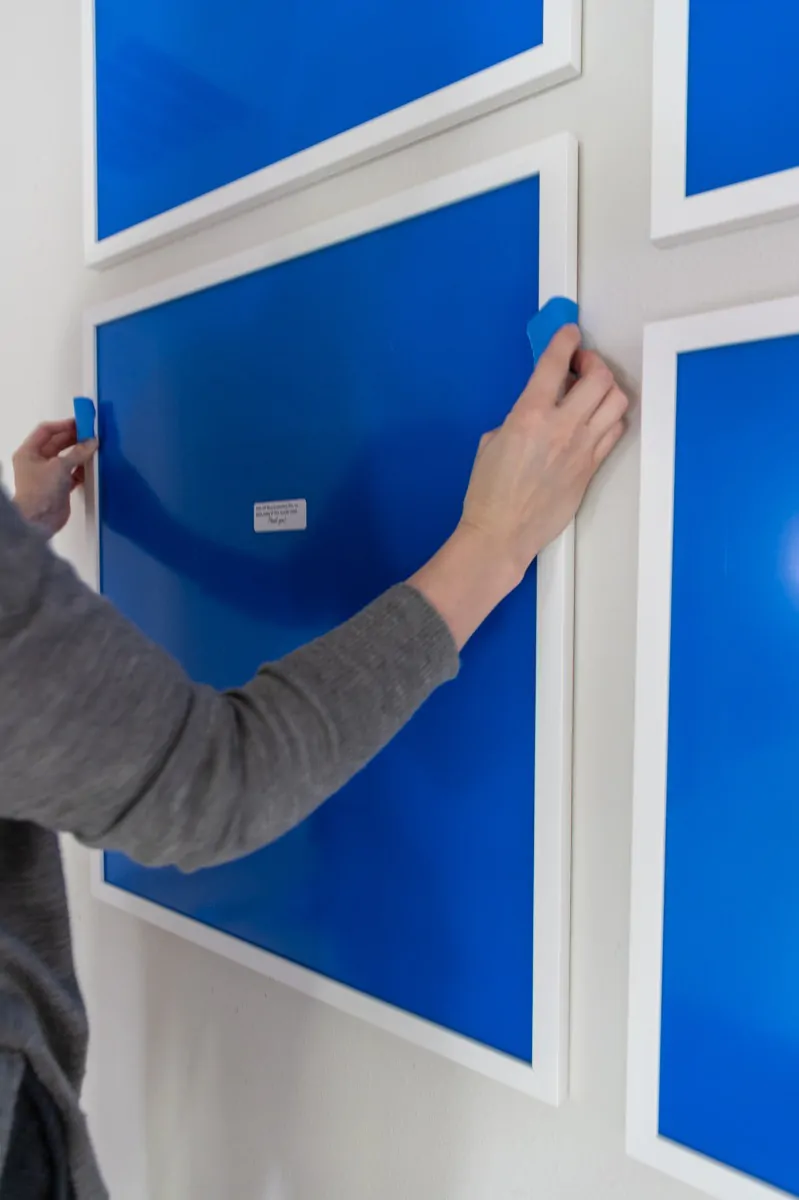
For a fuller list of which tricks actually work and which ones leave wall damage, see our picture frame hanging hacks guide.
Frequently asked questions
How high should you hang a picture?
Hang most pictures so the center of the frame sits 57 to 60 inches from the floor. That is gallery eye level, the standard used by museums and most residential designers. Above furniture, switch to the furniture rule: 6 to 12 inches above the top of the piece below.
What height should pictures be above a sofa?
The bottom of the frame should sit 6 to 12 inches above the top of the sofa. Closer than 6 inches looks crowded; farther than 12 inches looks disconnected. Pick a frame roughly two-thirds the width of the sofa so the proportions feel right.
Do you need wall anchors for picture frames?
Frames under 10 pounds hang fine on a single picture-hanging nail in drywall. Frames from 10 to 25 pounds need a drywall anchor rated for the weight. Frames over 25 pounds belong on a wall stud or a French cleat across studs.
How do you hang a picture without nails?
Adhesive picture-hanging strips (Command Strips and similar) hold 4 to 16 pounds depending on how many pairs you use. They work on smooth painted walls, in renter apartments, and for frames that get rearranged often. They fail on textured walls and on paint less than a month old.
How do you hang a heavy mirror or frame?
For 25 to 50 pounds, hang from a wall stud with a long wood screw or use heavy-duty toggle bolts. For over 50 pounds, install a French cleat across two studs. Acrylic glazing keeps the total weight lower than glass, which can move many frames down a hardware tier.
What is the 57-inch rule for hanging art?
The 57-inch rule places the visual center of the artwork at 57 inches from the floor, matching the average adult eye level used by museums. Residential designers often extend the range to 57 to 60 inches because home contexts vary more than gallery walls. The number refers to the center of the frame, not the top edge.
How do you space pictures on a gallery wall?
Leave 2 to 3 inches between adjacent frames. Less than 2 inches looks cramped; more than 3 inches breaks the group into separate pictures. Plan the arrangement on the floor first, then transfer to the wall using paper templates taped at scale before any holes get drilled.
How do you hang a picture on plaster walls?
Plaster walls crack if you hammer a nail straight in. Drill a small pilot hole first with a 1/16-inch bit, then drive the nail or screw through the pilot. For heavy frames in plaster, use plaster anchors rated for the weight and pre-drill carefully to avoid spider cracks.
Can command strips hold a heavy frame?
A single Command Strip pair holds 4 to 8 pounds. A four-pair set holds about 16 pounds. Anything over 16 pounds is beyond the safe range for adhesive strips, regardless of brand. Use a stud screw or a French cleat for heavier frames.
How do you hang a frame on brick?
Use a masonry drill bit and a brick or concrete anchor rated for the weight. Drill into the mortar joint rather than the brick face when possible; mortar is softer and easier to patch later. For removable hanging on brick, brick clips slip over the brick edge without any drilling.
How do you fix a frame that keeps tilting forward?
The D-rings are mounted too high on the frame back, putting the wire too close to the top edge of the frame. Take the frame down, remove the D-rings, and reinstall them 1/4 to 1/3 of the frame's height down from the top. The wire should peak 2 to 3 inches below the top of the frame.
What is the difference between hanging a frame on drywall versus a stud?
Drywall by itself is weak: a nail driven into drywall holds 5 to 10 pounds reliably, no more. A stud is solid wood behind the drywall and holds 50+ pounds with a single 2.5-inch wood screw. For any frame over 10 pounds, find a stud with a stud finder and hang from the stud rather than the drywall alone.
When to ask for help
Most pictures hang well with a tape measure, a level, the right hook, and ten minutes. A few situations are worth a call to a professional installer:
- Oversized frames over 50 pounds, especially over a sofa or bed where a fall would cause real damage
- Stairwell installations where reach and access make a fall risky
- Plaster walls in older homes where the wall surface is unpredictable
- Brick, stone, or concrete walls that require masonry tools
- Gallery walls of 8 or more frames where the layout matters as much as the hanging
For most frames in most homes, the process in this guide is the whole answer. Hang at the right height with the right hardware, level it, and step back.
Need a frame to hang in the first place? Start at the CustomPictureFrames.com homepage to design a frame in any size and finish.